PLASTIKARD - A Modelers Guide
What is Plastikard?
Plastikard is obviously a sheet of polystyrene material but it is of a grade specially selected for model making. Other varieties of polystyrene sheet are available some of which are equally suited to model work but there are others which are not. Some varieties are too dense which makes it too difficult to cut, some have too glossy a surface that makes accurate work difficult and painting almost impossible and others will not fracture cleanly. On the whole it is best to stick to Plastikard the branded product selected for the model maker.
The advantage of Plastikard as a model making material is that it will fulfill most of the non-mechanical functions of metal without the effort and mess that is inherent in metalworking. It can also be used in most situations where wood or cardboard are used but it avoids the need to fill the grain in wood and seal the edges of cardboard, and is usually stronger per given section than either.
Setting out.
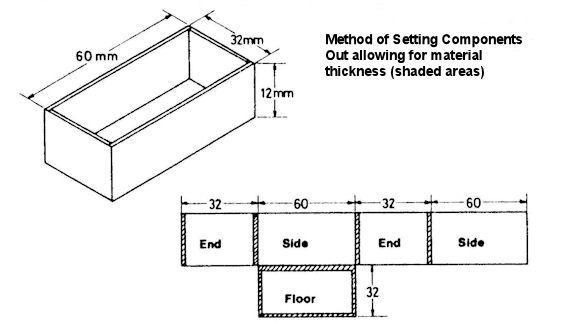
Before anything can be made the various components have to be laid out on one or more sheets of Plastikard. It is best to mark out and work from the rear of the sheet remembering that this involves reversing the desired shape. This is done best by cutting one edge of the sheet to a true straight line or using a factory cut edge as a datum. Verticals can be drawn using a square and a slightly hard pencil. It is best to draw all the major parts exactly as on your drawing and then to reduce the size of the components that will be assembled between others by the thickness of the material.

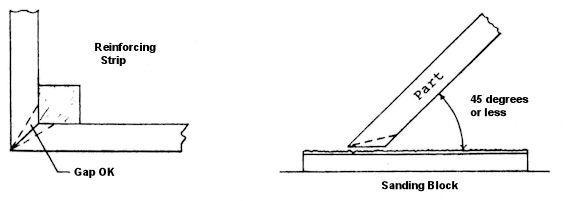
For practical purposes the following measurable dimensions will work when the thickness of a single sheet is involved: 20 thou (.020) = 1/2 mm, 30 thou (.030) = 1/32", 40 thou (.040) = 1mm, 60 thou (.060) = 1/16". After assembly, the plain edge of a stone or brick sheet can be carved to match the pattern of the mating sheet. When working with thick sheet, a mitered joint can be used to form the corner. Parts to be assembled with mitered corners are cut out to the finished size; they do not have to be reduced by the thickness of the material. To form the mitered corner the edge of each part must be "cut" 45 degrees to the rear of the material. Holding the part at a 45-degree angle to a sanding block and sanding the “cut” may do this. If the corner is to be reinforced, the relief formed for the mitered corner can leave the material with less than a 45-degree angle (the inside edges of the parts do not have to touch as long as the outside edges meet).

After outlining the components and allowing for material thickness when necessary, fill in the details, board lines to be scribed, centers of holes to be drilled and guide lines for details to be added. Curved lines should be drawn with a compass and then scribed using dividers. It is best to drill all holes and scribe all lines before cutting out the parts. Done this way the large sheet provides stability and gives you something sizeable to hold on to.
Cutting and Scribing.
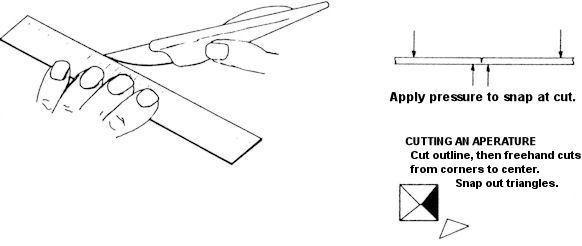
Plastikard except on very thin thicknesses cannot usually be cut through with a knife. It can of course be sawn either with a piercing saw or a razor saw but this is time consuming and only necessary in certain circumstances. Most cutting can be done with a craft knife guided along a steel straight edge. The technique is to make a light first cut and then keeping the straight edge in position make a number of heavier cuts until the knife will not penetrate further. At this point the Plastikard is held in both hands one on each side of the cut and flexed upwards. The Plastikard will snap cleanly along the scribed line.

Curved cutting is done freehand, unless a metal pattern is available, guided where possible by scribing in arcs as described in the above paragraph. Openings for windows and other things can be done by either of two methods. If the sheet is an inside part and will be covered by another sheet, the lines defining the size of the opening can be extended to the edges of the part and after scribing the part can be snapped (broken) into pieces. The opening piece is discarded and the other pieces are cemented back together using a solvent such as Mek Pak. If the sheet is the external surface of the part, the edges of the opening are scribed using a straight edge and then freehand cuts are made between opposite corners crossing in the center. Before cutting the opening No. 78 drill holes can be drilled at the corners of the window to keep the cuts from going too far. These freehand cuts will go deeper than the guided ones and when pressure is applied downwards on the central triangle points the Plastikard will give way and finally snap off at the edge of the opening. The remaining triangles can then be removed and only a small amount of cleaning will be required. Rounded openings in thick styrene can be created by drilling small holes along what is to be the edge of the opening and then smoothing the edge with a file.
Scribing is forming a groove in the face of the Plastikard either to create an impression of a joint line or to receive some applied detailing made with styrene rod. Scribing is done by forcing a steel “spike” into the face of the Plastikard and drawing it along the line to be scribed using a steel straight edge. This process may have to be repeated a few times depending on the type of “spike” and the width of the groove needed. Ideally the “spike” should be a scribe but a compass point or heavy needle in a suitable handle will also work. The resulting groove will have ragged edges but leave them alone until all the scribing is finished and then cut off the burred edges using a curved blade in a craft knife. The trick is to hold the blade as flat as possible against the Plastikard centered on the scribed line and then gently push the blade along the line cutting off the burs. A curved blade must be used because there is a tendency with other blades for the point to dig into the material.
Assembly of styrene parts.
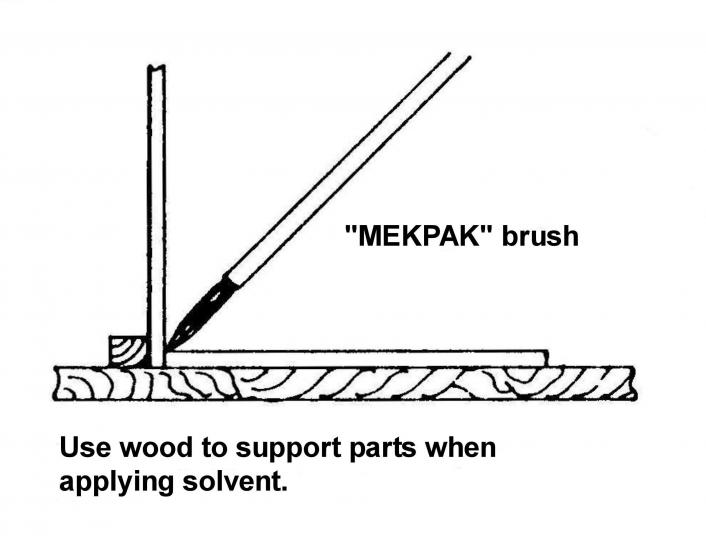
After cutting out the parts of the model, the details should be added. A useful selection of styrene rod or of Plastikard strips is available as Microstrip and these can be used to build up surface detail. Select some suitable rod or Microstrip for the detailing and place one end in position lined up with your guide line and then apply a spot of Mek Pak to the end of the strip; leave for a few moments until the end adheres and then adjust its position if necessary and run some Mek Pak down both sides of the strip. Next cut off the surplus “Microstrip” or rod. Repeat until as much detailing has been done as is possible on the flat. Then place the two major components together and brush some Mek Pak into the joint on the back side, leave for a few moments and add the other two major components in the same way, and so on. Forming the joint, transferring the glue to the joint on a brush and letting the capillary attraction pull the glue through the joint takes some getting used to, but it is better than applying the glue to the parts and then trying to assemble the joint while the glue dries out. The only real difficulty is knowing how much Mek Pak is needed. Initially use something like a 00 artists brush to apply the solvent glue and if necessary make two or more applications. Later on, after some experience, larger brushes can be used for heavier joints. Mek Pak can be used on most plastic kits and Plastikard can be used to modify most kits because polystyrene is the plastic used in most kits.

Assembly of styrene to backup or reinforcing material.
Wood, thick cardboard, thick styrene, foam board or ‘FOME-COR’ is often used to backup or reinforce styrene sheets. If the styrene sheet is to be fastened to a sheet of back-up material, this should be done before any details are assembled. For the most reliable joint between these two dissimilar materials their entire surfaces should be bonded with the adhesive. This is important since the materials expand differently when exposed to heat and humidity. The assembly will buckle anywhere the materials are not glued. Because wood and cardboard will absorb humidity and expand they should be sealed with paint. If thicker styrene, foam board or ‘FOME-COR’ is used for backup, it does not have to be painted.
The adhesive used to coat and bond the surface of the styrene to that of the wood, cardboard, thicker styrene or foam board must be capable of sticking to both while not damaging either. The most universally used adhesives for dissimilar materials are rubber-based cements. Walther's 'Goo' is a well-known example of a rubber-based glue, which works well with dissimilar materials. Adhesives like 'Goo' that contain chemical solvents can be used with styrene if only a small amount of glue is needed. For example, strips of wood could be fastened to styrene with 'Goo'. When a sheet of styrene, such as the wall of a building, is to be glued to a sheet of backing material, the chemical solvent adhesives cannot be used because the large amount of solvent in the glue will attack and disfigure the styrene. The safest and most reliable rubber based adhesive to use with styrene is Elmer's ‘Saf-T’ Contact Cement. The solvent in ‘Saf-T’ is water, which will not affect the styrene. The ‘Saf-T’ is brushed smoothly on the styrene and on the wood, cardboard, thicker styrene or foam board. When the color of the ‘Saf-T’ changes from white to clear, the two sheets are pressed together to stay. This is the contact cement method of assembly. One edge of the parts should be lined up before the major surfaces touch because once the two glue covered surfaces touch it is not possible to move or adjust the parts.
A sheet of double sided pressure sensitive adhesive film can also be used to join the materials. Using adhesive film such as ‘STICKM’ between the styrene and its backup results in a more uniform layer of adhesive. ‘FOME-COR high tack’ sheet is manufactured with pressure sensitive adhesive on one side. A release liner protects this adhesive until use. Just cut the ‘FOME-COR high tack’ to size, peal off the liner and position the styrene sheet. After the styrene sheet is bonded to it’s backing, the details should be applied. The details can be assembled to each other and the sheet with ‘Saf-T’ or an adhesive like 'Goo'.
SPECIAL TECHNIQUES:
D.I.Y. "Microstrip".
While Microstrip is an excellent product, it may not be available in the lengths or sizes needed for a specific model. It is possible to cut a narrow strip from the edge of Plastikard up to 40 thou thick by just cutting deeper and deeper with a craft knife until the material is penetrated. The problem with cutting such a strip is that the strip, as it is freed from the sheet, will curl up like a spring. The secret to prevent this curling is to make the cut just short of both ends of the sheet thus restraining the ends while the cutting is taking place. After the cut is through the thickness of the sheet, the strip is released by cutting through the remaining material. The styrene strip cut this way will curve a little but not more than can be pulled out.
Shaping.
Plastikard can be profiled by holding a knife blade roughly at right angles to the material and scraping down the length repeatedly until the approximate profile is achieved. Finish the edge with fine emery cloth mounted on a piece of wood. When using a laminated block made up of pieces of Plastikard, do not try shaping until at least 24 hours after bonding the pieces to be sure the joints are hard. Files, planes and surform tools can also be used to shape Plastikard, but the scraping technique is very effective once mastered.
Bending.
There are two basic techniques that can be used to bend or curve Plastikard. Firstly, sheets or thin strips of thin Plastikard may be laminated over a form of the desired shape. The Plastikard can be held against the form with double-sided tape. Leave the parts to set for a day before removing the finished part from the form. Secondly, the Plastikard can be wrapped around a suitable form and secured with a strip of cloth. Then the plastic wrapped form is submerged in boiling water for a minute or so. After removal from the hot water, it should be placed in cold water to set the shape. With either method the Plastikard will have taken the shape of the form. More complex shapes may require internal and external formers and further techniques will come from experience.
Embossing.
Rivet beads may be embossed from the rear of the sheet by pressing a point from the rear with a scriber, pin or "ponse / gear wheel".
Structural Strength.
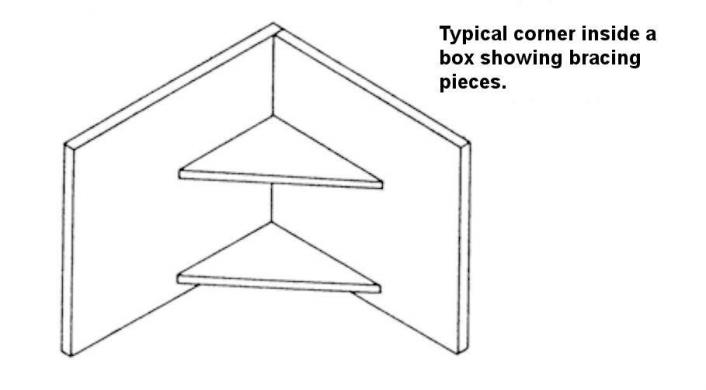
It is impossible to give a general guide to what thickness material should be used for which model except that 20 thou sheet is usually the minimum thickness for structural work in HO scale. Obviously the larger the area the thicker the sheet needs to be to support itself. Where possible, work with self-supporting closed boxes. False roofs, intermediate partitions and floors add greatly to the strength of a structure.

Acknowledgement: Our grateful thanks to S. Bourne and Slater's Plastikard Ltd. for this article.